|
|
|
Full
Step-by-Step to install Skins
How to download, unzip and install skins in your
game
|
| |
|
|
| |
| What
do I need? |
|
To use the files offered on this site, you will
need to have:
- a computer
- an internet connection
- an internet browser like Microsoft Explorer or Netscape Communicator
(but you must have something like that to surf on my site! ;))
- an utility to unzip the downloaded files, like WinZip
(if you find another tool that unzip your files, you can use
it, but it's Winzip I'll use in this tutorial).
|
|
|
| Things
you should know first |
The skins found on this site
have a particularity: they're distributed without mesh. So
it means you have to download the skin AND the mesh.
In short, the skin is the texture, and the mesh is the 3D
shape.

You also need to choose the version you want to download:
Some skins come in two versions: one "normal" and
one "buyable". The first one doesn't require
any expansion pack; the buyable one means that those skins
can be bought by your Sims in shops, on Downtown or Vacation
lots. Some buyable skins are made for Hot Date, some for Vacation.
The table below will help you to know what expansion is needed
for a particular skin:
| Ab. |
Name of the
expansion |
What skins
are concerned |
| Sims |
The Sims |
casual wear
no-buyable |
| HD |
Hot Date |
adult buyable pajama
adult buyable formal
adult buyable swimming-wear |
| SV |
Sims Vacations |
adult buyable winter wear
children buyable winter wear
children buyable pajama
children buyable formal
children buyable swimming-wear |
| SS |
SuperStars |
adult buyable high-fashion |
In our example, we'll take a
skin of a formal dress, for woman, in its buyable format, so
it will be a HD version, but the process is the same for all
the skins.

The installation of the skins found of this is a bit different
from other files because they're zipped on Mac, and not
on PC (for skins found on other sites, the installation is like
the one I described for objects or walls. Sorry to be different
here, but it's the only way I can make my skins available for
Windows users too).
This way of installation can also be adapted and used for other
files (objects, walls and floors).
|
|
|
| Creation
of a shortcut for the Skins folder |
For installing easily our skins,
we're going to create a shortcut for the Skins folder on the
desktop. Once it's done, you will use this shortcut for all
the skins you want to install. Note that you can also create
shortcut for your Downloads folder, Walls and Floors, but let's
see first how creating the Skins folder shortcut:
-1-
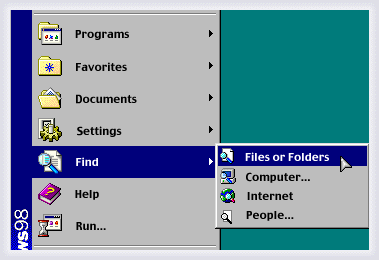
We need to find our GameData folder, so click on the Start
button, at the bottom of your Windows screen, and click
on "Find...files or folders"
-2-
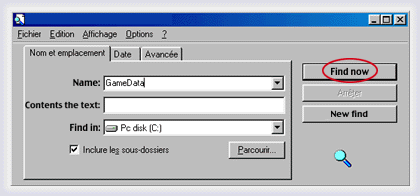
Type "GameData" in the "Name" field,
and click on the "Find now" button.
The look of your find window
might be a bit different as I use a french version of Windows...
-3-
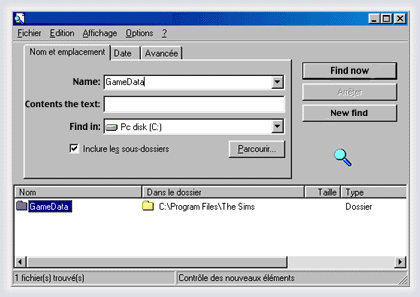
The results of the search appear at the bottom of the Find
window. If you have found several "GameData", choose
the one in C:\Program Files\The Sims.
Open your GameData folder by double-clicking on it.
-4-
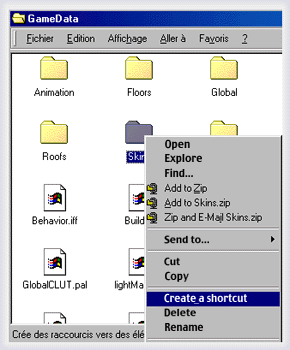
Then, select the Skins folder, and with the contextual menu,
create a shortcut:
-5-
Drag your shortcut on your desktop. You'll have your Skins
folder near the hand, now, each time you need it.

|
|
|
| How
do I download a skin? |
|
-1-
First, you need to put your cursor on the name
of the skin you want to download Here, we have chose the HD
skin (see the previous chapter to know about Sims or HD versions).
Then, click.

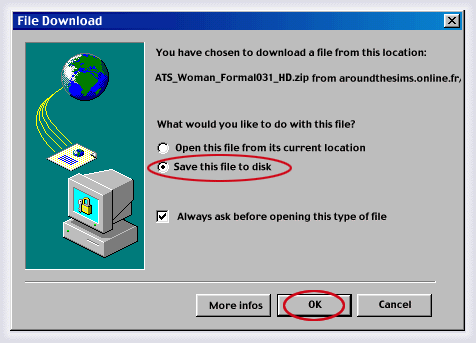
-2-
A window appears and asks you what you want to do with the file.
Click on the "Save this file to disk" button,
then click on OK.
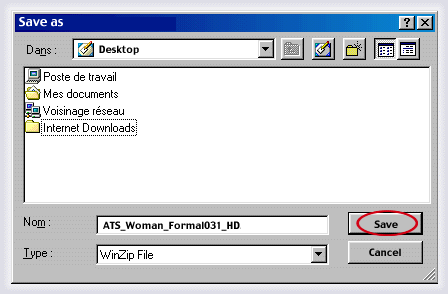
-3-
A new window asks you where you want to save the file. I don't
know how you organize your disk, but I like having an Internet
Downloads folder on my desktop, so I always save my files in
this folder. In any case, click on where you want to save the
download (it can be on the desktop, in another folder, it's
up to you...), and then, click on the button "Save".
-4-
A window appears and give you an indication of the time the
download will take. You don't need to do anything there.
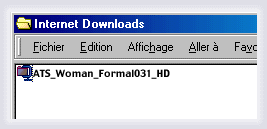
-5-
Now, if you double-click on your Internet Download, located
on your desktop, you'll see that we have the ATS_Woman_Formal031_HD.zip
in our folder.
-6-
We're going now to download the mesh. The process is the same
as for the skin. Once you have a particular mesh, you don't
need to redownload it. For example, once we'll have the B377fafit
mesh, we don't need to redownload it for all the dresses that
use this same mesh, unless we need another version of this same
mesh (we have downloaded the HD version, but we could need the
Sims version someday).
Anyway, let's click on the name of the mesh to download;
be sure to download the same version as the one you chosed for
the skin (HD, SV, Sims...)

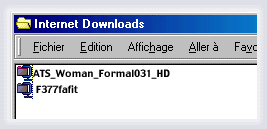
-7-
So the process is the same: save to disk, and see, the mesh
is now in our Internet Download folder:
We're now ready to unzip and to install the skin and its mesh.
|
|
|
| How
do I unzip and install the skins I have downloaded? |
|
-1-
Let's go in our Internet Downloads, and double-click on the
item you want to unzip.

-2-
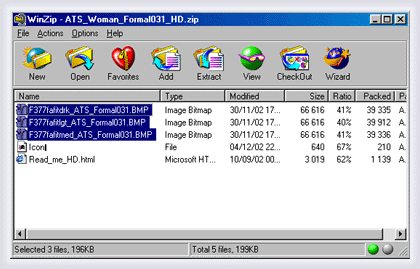
It will automatically open WinZip. Then, select all the items
you want to unzip by clicking once on it (you can select more
than one by clicking with the Shift key pressed). Skins are
Bitmap files.
Don't bother about the "Icon" file: it's there because
the files have been zipped on Mac, but it's useless for Windows;
you'll even get a message saying that a password is needed,
if you try to open it, so just ignore this file.
As long as you know where installing the skins, it's not useful
to read the Read-me included with skins.
-3-
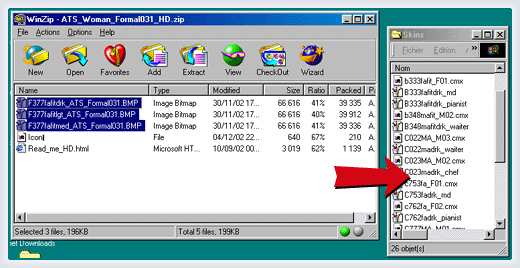
Open your Skins folder from the shortcut you have installed
on your desktop, and drag the selected files of WinZip to
the Skins window.
-4-
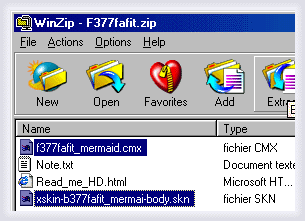
Now, do the same thing with the mesh: go to your Internet
Download, and double-click on the mesh file. You absolultly
need to extract the .CMX and the .SKN files, so select
them both and drag them on the Skins folder.
There's always a Read-me for the credit of the mesh; you should
extract it to your desktop and read it. The author of the
mesh has sometimes useful informations for you: can you redistribute
this mesh, and how, how it has been made, where it has been
found...
And here we go: you have installed your skins!
|
|
|
|
If your skins don't appear in your game, if you only
see the hands of a NPC you have download, check your Skins folder:
Bad installation
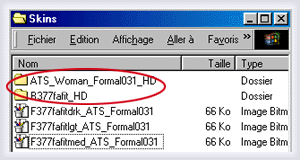
There's some folders in the Skins folder. Their content won't
show up in the game.
Correct installation
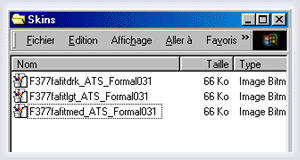 This folder contents only files. It's perfect!
=)
This folder should content only files, not a single
folder. If you see a folder somewhere, its content won't appear
in your game, so you need to open the folder and take the
files that are inside and move them in the Skins folder. You
can now delete the empty folder.
|
|
|
| Should
I replace my old files by the latest ones, when I'm asked for? |
Sometimes, you might have already a file with
the same name, and Windows will ask you if you want to replace
if with the one you have just unzipped.
Say "no": if your game works fine like that,
don't change anything and keep your old files. No need to screw
up the game. =)
If your new skins don't appear, it will still be time to reinstall
the latest ones. |
|
|
| Where
will I find the skins I have downloaded? |
If you have downloaded "normal" versions
of a skin, you'll find it when you create a new Sim or when you
change the clothes of an existing Sim, using the wardrobe.
If you have downloaded the "buyable" version, then you'll
need to send your Sims to Downtown or to Vacation, on a shop where
they will be able to buy their new formal wear, lingerie, swimming-suit...
If you have downloaded the normal version of a skin but would
like to use it to replace a default skin, then read the FAQ
about skins. |
|
|
| What
should I do with the .zip files, once I have unzipped them? |
| You can do what you want, actually. Most of the
time, you won't have to use them anymore, so you can delete them,
or make a back-up, whatever you want. |
| |
|
| Donations |
| |
| |
| |
| |
| |
Newsletter |
|
Search |
| |
| |
| |
| Help
for Mac |
| |
| |
|